
You are using an out of date browser. It may not display this or other websites correctly.
You should upgrade or use an alternative browser.
You should upgrade or use an alternative browser.
Is there anyone know good tips of setting offset?
- Thread starter Borkjh
- Start date


maxman
Well-known member
If you know how to count numbers, you can do it. Every image in the computer is measured in pixels.
Here's an example of Mario.

The image here is 16x24. This means it's measured in 16 pixels wide and 24 pixels high. For a better view to count how many pixels or dimensions the sprite has, checkmark "Gridlines" box for viewing the gridlines of pixels in an image. Go to View tab first and then checkmark the "Gridlines" box.
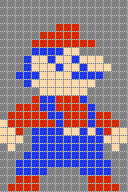

If you want to make a bigger canvas for the background, you can increase its image size like this one. Its pixel dimension is 30x30.

For beginning how to code, you can start with offset 0 0. It's gonna look odd for the first time you do it, but you can make adjustments by changing the numbers of its position. It relies on the image that is used.
Here's an example of Mario.
The image here is 16x24. This means it's measured in 16 pixels wide and 24 pixels high. For a better view to count how many pixels or dimensions the sprite has, checkmark "Gridlines" box for viewing the gridlines of pixels in an image. Go to View tab first and then checkmark the "Gridlines" box.
If you want to make a bigger canvas for the background, you can increase its image size like this one. Its pixel dimension is 30x30.
For beginning how to code, you can start with offset 0 0. It's gonna look odd for the first time you do it, but you can make adjustments by changing the numbers of its position. It relies on the image that is used.

Bloodbane
Well-known member
Can you help me?
For most situations, the best spot for offset setting is at middle below character's body and at same y as lowest coord of their feet.
I said most cause some entities require setting offset at different spot.

It depends on the subject. Assuming a bipedal character, then you will usually want the offset at or close to their lowest center of gravity when standing idle. This gives you the best versatility for most animations and shadows. Use a single image size large enough for most (preferably all) of your animations so that you don't need different offsets for them. The engine will auto trim on load.
This in turn allows you to declare an offset once per animation and not worry about it otherwise.
Again, the lowest center of gravity for the subject. That doesn't always mean the lowest center pixel. See the examples. Mario is a completely flat image, so the center pixel between his feet is fine. Terry is drawn with perspective, so in his case you'll want to place his offset accordingly.


HTH,
DC
This in turn allows you to declare an offset once per animation and not worry about it otherwise.
Again, the lowest center of gravity for the subject. That doesn't always mean the lowest center pixel. See the examples. Mario is a completely flat image, so the center pixel between his feet is fine. Terry is drawn with perspective, so in his case you'll want to place his offset accordingly.
HTH,
DC
Last edited: